| Step 1: |
In HaptiSync Center, go the Haptic Output Tab to validate that all settings are set appropriately. A) Make sure your system is in the ON position (the switch is at the top-left corner).
B) Ensure your system is not muted and the Intensity Level is correct.
C) Review all other setting to ensure they do not affect your haptic experience:
|
| Step 2: |
Reset the specific motion code settings for the game you are playing. In HaptiSync Center, select your game and click "Haptic Settings & Profile Selection". In the Motion Profile Editor, reset all settings.
|
| Step 3: |
Verify that the Haptic System, KCU-1P or KCU-1X (if using one) and computer are powered on. If using a KCU, check the KCU LED Status and perform corrective actions if needed. |
| Step 4: |
The G5 and G3 (with ACM G3 FLEX) haptic systems have a switch to select the voltage. Ensure to select the proper country voltage. |
| Step 5: |
Make sure your haptic system is connected to a grounded electrical outlet. Do not use adapter plugs or remove the grounding prong from cables. If you must use an extension cable, use a 3-wire cable with properly grounded plugs. Don’t connect to a circuit with a GFI breaker. |
| Step 6: |
If you have a G2/G3 haptic system, check your haptic system’s connection and make sure you are connected on the right ports. Verify that all termination loops are closed when applicable. The last ACM Main and ACM Secondary must be terminated with a CAT.5e or 6 shielded cable. Please refer to the G2 or G3 Installation Guide for more details. |
| Step 7: |
Verify that all cables (power & network) are firmly plugged in. If you have a G3 haptic system, always use the original USB cable supplied with the KCU-1P or KCU-1X. Other USB cable might not be compatible. All network cables must be CAT5e or 6 Shielded. We strongly suggest using the network cables supplied with your haptic system. |
| Step 8: |
Do a visual inspection of your system to make sure nothing prevents the actuators from moving properly. Power cord(s) and network cable(s) must be secured and away from the actuators path. |
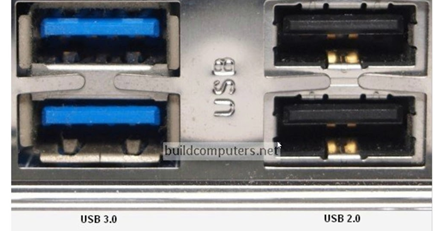
| Step 9: |
Make sure that any D-BOX equipment is connected to the PC via a USB 2.0 port like the one shown below (Black connector). Erratic behavior could be found when connecting some of the D-BOX equipment on ports USB 3.0 (Blue connector).
|
| Step 10: |
Reset the entire system:
Note : If the actuators move up and down continuously, there might be a cable or a foreign object preventing the actuators from functioning properly. |
| Step 11: |
Proceed with a motion & communication test. In HaptiSync Center: click Start Haptic System Test in the Haptic Output section.
If the haptic system is moving following the test pattern, it means the computer can communicate with the haptic system correctly. Your can now perform a full test using your D-BOX compatible software. If the haptic system can’t perform the communication test, navigate to the Haptic Output tab and check if there are some alarms and refer to the ‘’Systems Faults & Alarms’’ section. If there is no alarm, you may need to update the firmware of the system by following the instructions in this article. |
| Step 12: |
Download and install the latest version of HaptiSync Center. |
| Step 13: |
Verify your D-BOX equipment firmware and configuration (refer to the System Configurator articles). |