The Configuration Update tab allows you to change the configuration of the platform connected. Here are the actions you may perform using this tab:
- Configure your haptic system (actuator positions and axes (Degrees of Freedom - DOF)
- Change the position assigned to each actuator
- Change the number of actuators in the configuration
- Modify the number of ACM in the configuration
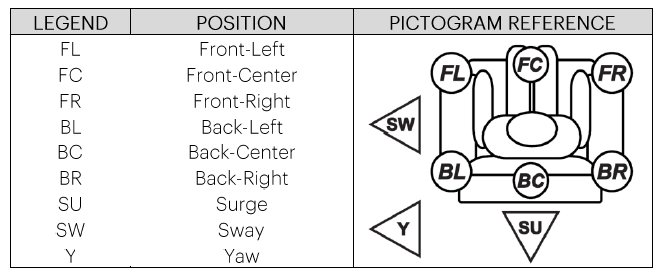
Actuator positions (AIF)
The following logo is used to represent the actuator positions. It represents a person sitting in a recliner. The figure displays the actuator positions.
Step-By-Step
| Before starting, download and install the D-BOX System Configurator. You can find it in the Download section of the website. | |
| Step 1: |
Access the Configuration Update tab. In the Hardware Selection box, select the KCU-1P connected to the platform you want to update. If there is only one KCU, no selection is needed.
 |
| Step 2: |
Select the platform number (if multiple platforms are connected to the KCU-1P). If there is only one platform connected to the KCU-1P, no selection is needed. The Actual DOF Configuration box shows the configuration which is connected. There is no selection to be done in this box. |
| Step 3: | In the DOF Configuration Filter box, validate that the number of ACMs/interfaces detected is accurate. If it is not the case, check the connections and click Refresh Information. |
| Step 4: | Validate that the number of actuators detected is accurate. If this is not the case, set the actuator count. |
| Step 5: |
Check the boxes of every axis (degrees of freedom) - supported by the new configuration and click Refresh information. The following window appears.
The Configuration and Description section shows the list of all the available configurations. Select the appropriate configuration from the configurations list or enter the configuration number in the configuration field. The layout of the selected configuration appears in the Compatible Configuration Selection box. The layout displays the following elements:
NOTE: Entering the configuration code in the configuration field yields the same result. |
| Step 6: |
Once the configuration is chosen, click the Apply Configuration button to start the configuration update process, then follow the instructions. Once the configuration update is complete, the following confirmation window appears.
|
| Step 7: | Change the configuration stickers on top of the ACM. |


Video