Handling actuator cables and connections while the ACM is powered could cause injury or death. There equipment operate under extremely high voltage. Always turn off the system power by unplugging ACM power cord before.
You must ask D-BOX Support authorization prior opening the main cover of an ACM. Opening the main cover of an ACM without formal authorization voids the warranty.
Choose your actuator type
AC10 (1.5in) Actuator
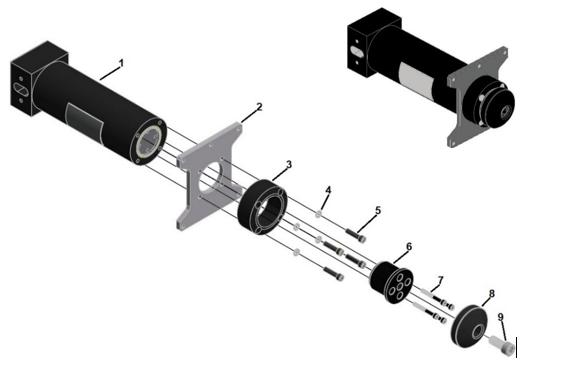
AC10 H-Bracket Removal
| Step 1: | Remove bolt (9) and pivot (8). |
| Step 2: | Remove bolt (7) and end-piston-adapter (6). |
| Step 3: | Remove bolt (5), lockwasher (4), stop (3) and H-bracket (2) from housing (1). |
AC10 H-Bracket Installation
Note : Apply one drop of Loctite 243 blue threadlocker on bolts (5), (7) and (9) before installation.
| Step 1: | Align holes on H-plate (2) with holes on housing (1) and align holes on stop (3) with holes on H-plate (2), and then secure with lockwasher (4) and bolt (5). Torque bolt (5) to 98 lbf.in. |
| Step 2: | Align holes on end piston adapter with holes on piston end and secure end piston adapter (6) with bolt (7). Torque bolt (7) to 40 lbf.in. |
| Step 3: | Secure pivot (8) on end piston (6) with bolt (9). Torque bolt (9) to 130 lbf.in |
AC231 (3in) actuator
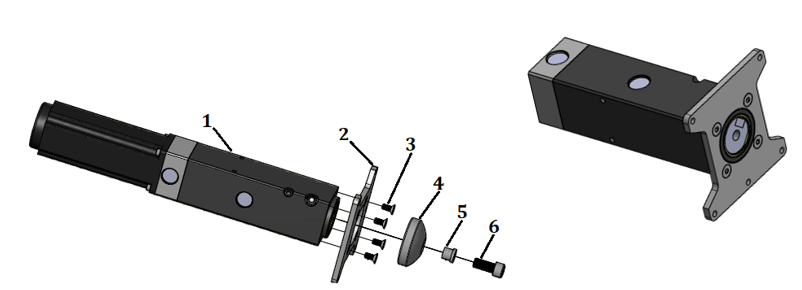
AC231 H-Bracket Removal
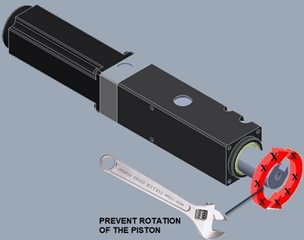
Caution : extend the piston and lock with a wrench to avoid breaking the cam follower.
| Step 1: | Remove bolt (6) with a 3/8” hex bit, spacer (5) and pivot (4). |
| Step 2: | Remove bolt (3) and H-bracket (2). |
AC231 H-Bracket Installation
| Step 1: | Place the H-bracket (3) on the end of the piston body (1) with the screw holes aligned. |
| Step 2: |
Apply Loctite 243 (blue) thread locker in the four blind holes (2) on the piston body. Apply the thread locker just before the bottom of the blind holes. |
| Step 3: | Use a 5 mm bit to secure the H-bracket plate to the piston body with 4 screws (item 4, M6 X 1.0 X 14 mm), then tighten the 4 screws to a torque of 133 N m (98 lbf in). |
| Step 4: | Install pivot (4) with spacer (5) and bolt (6). |
AC360 (6in) actuator
Note: there are 2 models of H-brackets; one with seven mounting holes, one with 10 mounting holes. The procedures are the same for both models. Only the ten holes model is shown here.
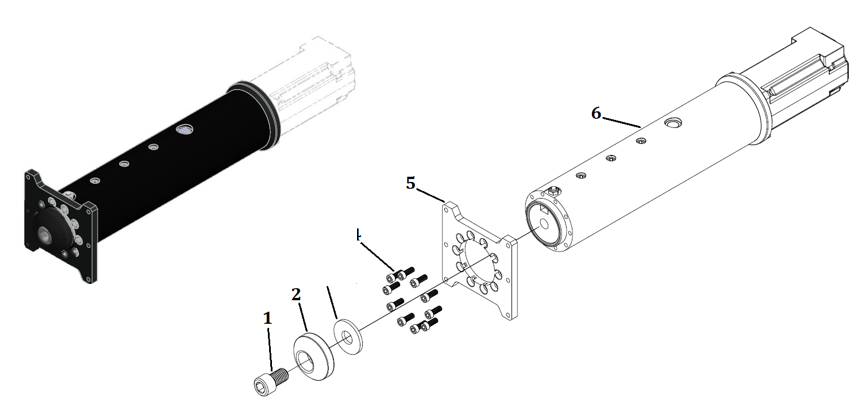
AC360 H-Bracket Removal
| Step 1: | Remove bolt (1) - 3/8” hex bit - pivot (2), and flat washer (3). |
| Step 2: | Remove bolt (4) and H-bracket (5). |
AC360 H-Bracket Installation
| Step 1: | Place the H-bracket (5) on the end of the piston body (6) with the screw holes aligned. |
| Step 2: | Apply Loctite 243 (blue) thread locker in the ten blind holes on the piston body (6). Apply the tread locker just before the bottom of the blind holes. |
| Step 3: | Use a 5 mm bit to secure the H-bracket to the piston body with screws (item 4, M6 X 1.0 X 14 mm), then tighten the screws to a torque of 133 N m (98 lbf in). |
| Step 4: | Install pivot (2) with washer (3) and bolt (1). |